Create a quick and easy set of stipple Illustrator brush files perfect for craeting vector flash art designs ready for tattoos, posters, and more! The techniques explored in this tutorial can be applied to other styles of brush creation as well.
Tutorial Details: Stipple Illustrator Brush
Final Image: Stipple Illustrator Brush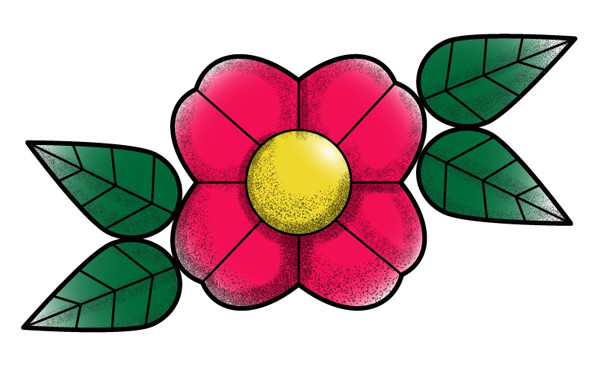 Step 1: Stipple Illustrator BrushLet’s begin making our stipple Illustrator brush – using the Ellipse Tool draw a circle (hold down the Shift key) and then Lock the object in the Layers panel. Using the Blob Brush Tool, click blobs around the center of your circle and begin to radiate them outward. You’re stippling, and creating tiny dots. Vary the size of your blobs slightly and try to keep them mostly smooth and circular (though not quite perfect is fine too).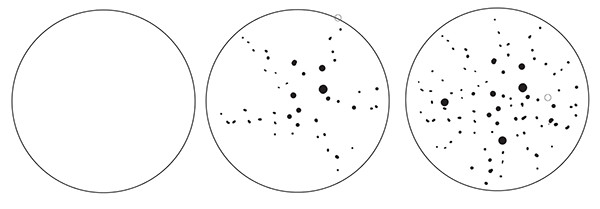 Step 2Every so often Group together your stippled dots and Copy and Paste your design so you have light and dense brushes to choose from later. Continue adding shapes and stippling within your circle, concentrating more shapes in the center and radiating them outward.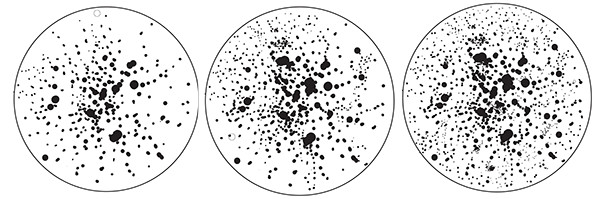 Step 3For a lighter stipple Illustrator brush, start fresh with a new circle. Lightly scatter small blobs coming from the center and moving outward. Notice how much space exists between each dot. You can create a variety of brush styles.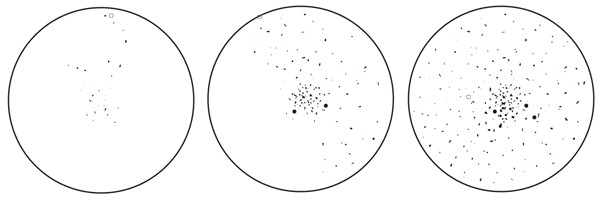 Step 4When you’re satisfied with your stippled circle designs, delete the circles and make sure each section is grouped together. I drew four brush styles below.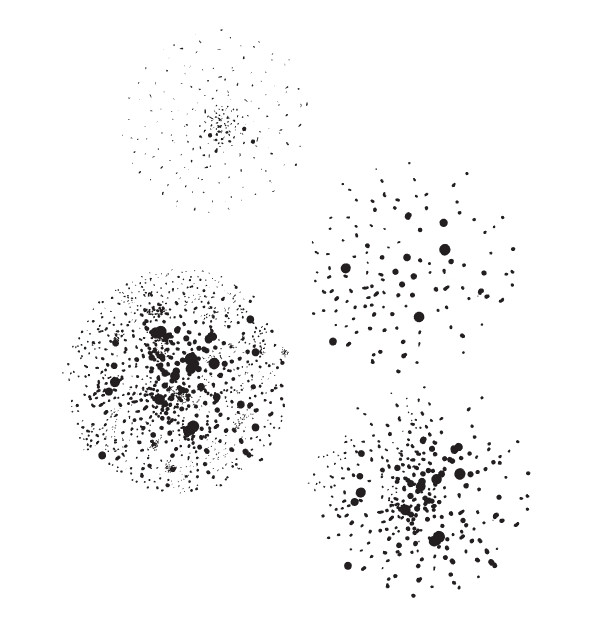 Step 5Select one of your stipple groups and in the Brush panel, create a New Scatter Brush. The settings you’ll want to choose are next!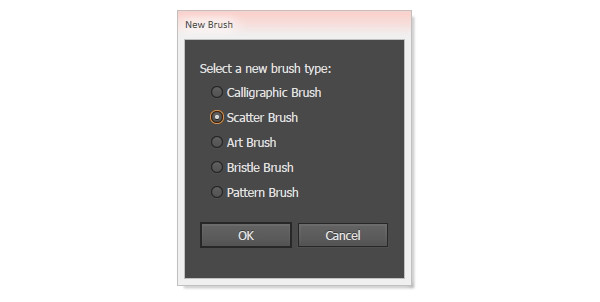 Step 6Set Size to Pressure with a range from 5% – 200% (or less of a margin). Set the Spacing to Fixed at 10%. Set Scatter to Fixed at 0%. Finally set Rotation to Random at 150° to -150°. Hit OK. Your new brush is ready to use! Repeat for the other brush styles so you have your whole set ready to go. Step 7Let’s create a design in which to use our new brushes! With the Ellipse Tool draw two circles. One should be small while the other large. Align them to their centers.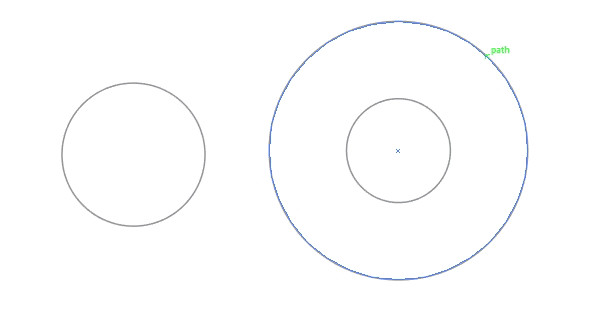 Step 8Select the larger circle and go to Effect > Distort & Transform > Pucker & Bloat to apply a Bloat effect of 18%.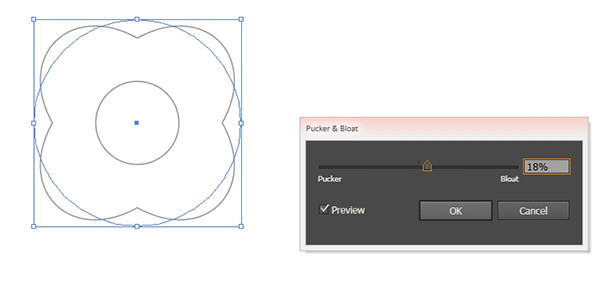 Step 9Use the Line Segment Tool to draw four lines connecting the petal divisions to the center circle.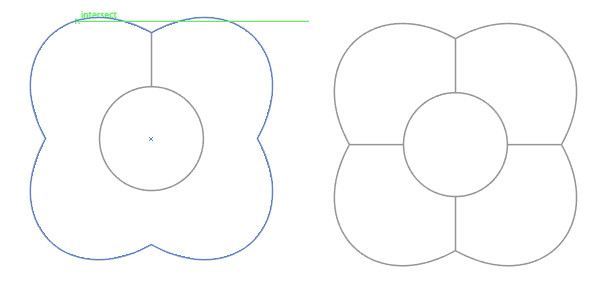 Step 10Under Object hit Expand Appearance. Use the Pen Tool to add anchor points to the center of each of the four petals. This time, apply a Pucker effect of 5%.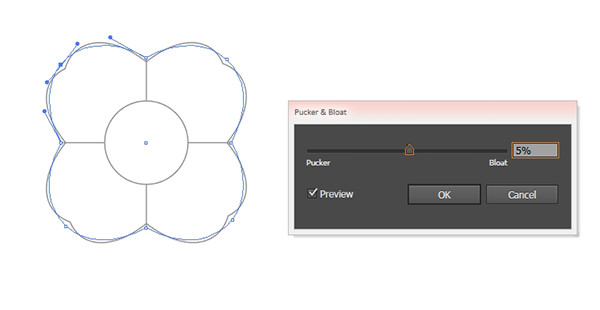 Step 11For the leaf, either use the Pen Tool to draw a leaf shape, or draw a circle and pull one of the anchor points outward with the Direct Selection Tool. Then, convert that anchor point from a curve to a point. Use the Line Segment Tool or the Pen Tool to draw veins in the leaf.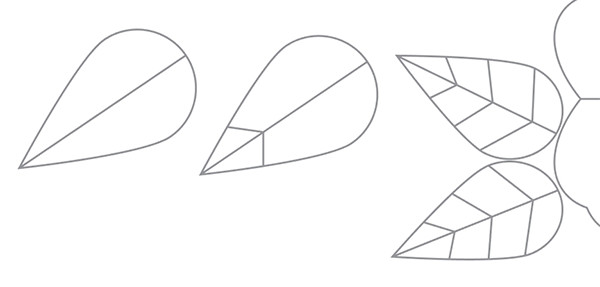 Step 12Copy and Paste a few leaves and gather them around the flower, Rotating and Reflecting them as you see fit. Add additional lines in the center of the flower’s petals.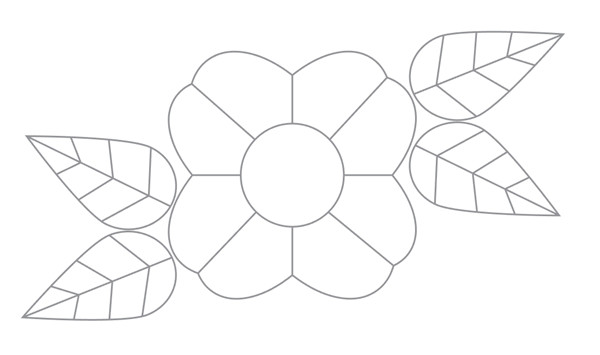 Step 13Select the larger base shapes and give them a thicker stroke weight than the inner shapes (lines and veins).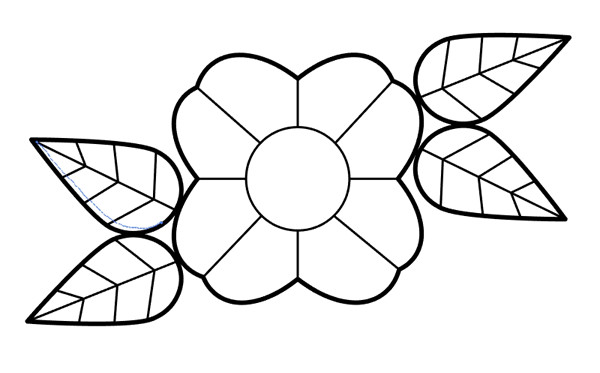 Step 14Now, using the Paintbrush Tool, select one of your newly made stipple brushes from the Brush panel. Draw several strokes around your design to shade in your design.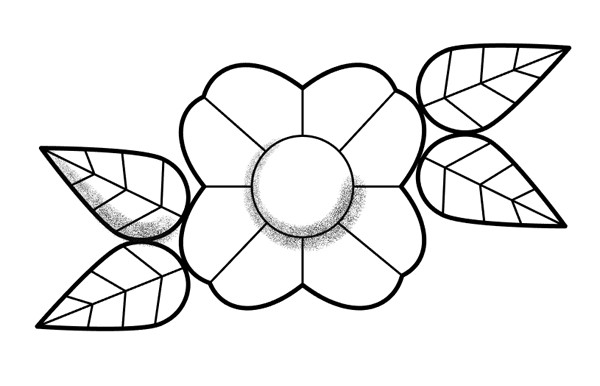 Step 15You can shade very lightly or do so darkly with a denser stipple Illustrator brush. Additionally, if you’re not using a pressure-sensitive tablet, you may just want to use the Pen Tool and adjust the stroke width as needed.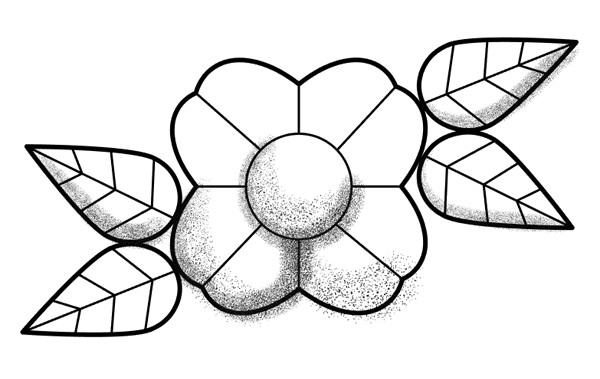 Conclusion: Stipple Illustrator BrushYou can keep your final design black and white…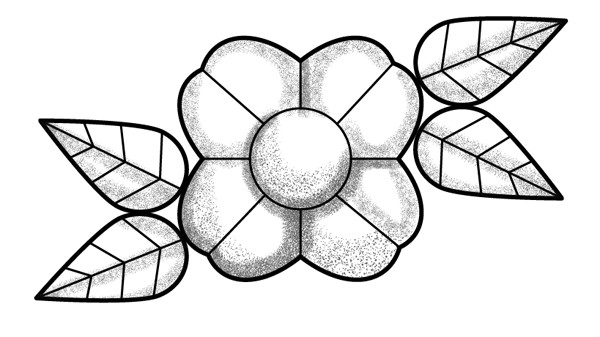 …or add color and gradients to it if you wish. Share your stippled flash art designs in the comment section below! What other sorts of textured brushes would you like to see as a tutorial? Let us know in the comment section as well, as we’re always listening to what fantastic design styles you’d like better insight into creating. Author: Mary WinklerMary works under the brand Acrylicana® designing apparel, jewelry, and illustrating for companies like Disney, Jakks Pacific, Envato, and more. Check out Acrylicana.com for more artwork, tutorials, and more. |

Tuesday, September 29, 2015
Create an Easy Stipple Illustrator Brush From Scratch
Tuesday, September 22, 2015
Vector Freebies! 14 Exclusive Floral Vector Stamps
Asmaa Murad, from Aivault, has created an awesome set of floral stamps for Vectips! I quickly got lost in creating scatter brushes, patterns, and more with the 14 Floral Vector Stamps. Download the set and see what you can come up with! Post links in the comments to your creations!
 Illustrator Version: CS No. in set: 14 License: See Download  Sample Usage: Floral Vector StampsBelow is a quick pattern I put together using a couple of the free Floral Vector Stamps. See what you can come up with and post links to your work! |
Tuesday, September 15, 2015
Create a Realistic Plexiglas® Plate Vector
In this tutorial you will learn how to create a semi-realistic Plexiglas® Plate Vector in Adobe Illustrator. You will find out how to add shadows and highlights to your Plexiglas® Plate using different Blending Modes and finally how to create a conical gradient using the Envelope Distort technique. Let’s begin!
Tutorial Details: Plexiglas® Plate Vector
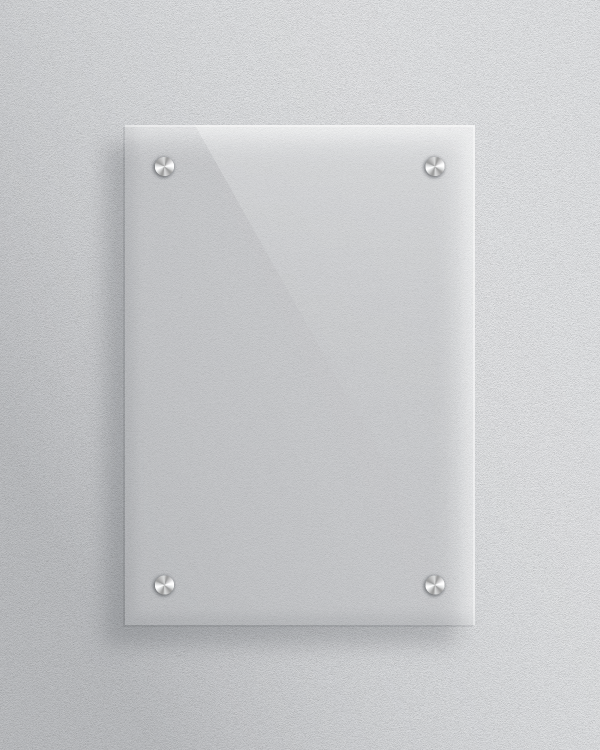
Final Image: Plexiglas® Plate Vector
As always, this is the final Plexiglas® Plate Vector that we'll be creating:
 Create a Plexiglas® Plate VectorStep 1
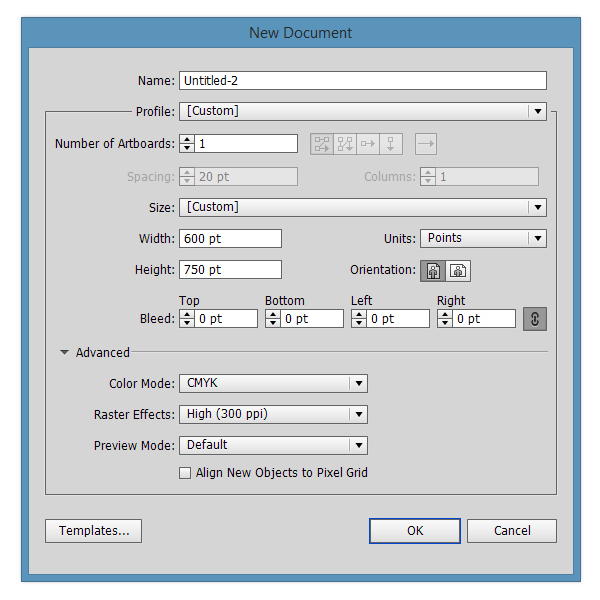
Open Adobe Illustrator and create a new document (Ctrl + N). Select CMYK Color Mode, 300 DPI Raster Effects and make sure that Align New Objects to Pixel Grid is unchecked.
Next, go to Edit > Preferences > General and set the Keyboard Increment to 1px.
 Step 2
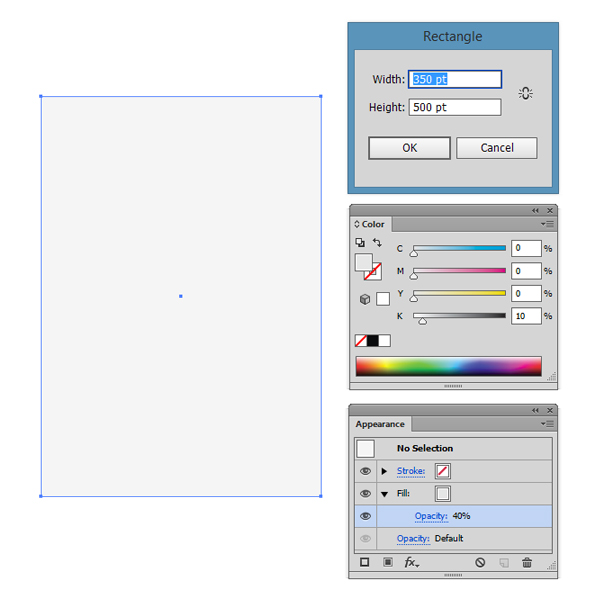
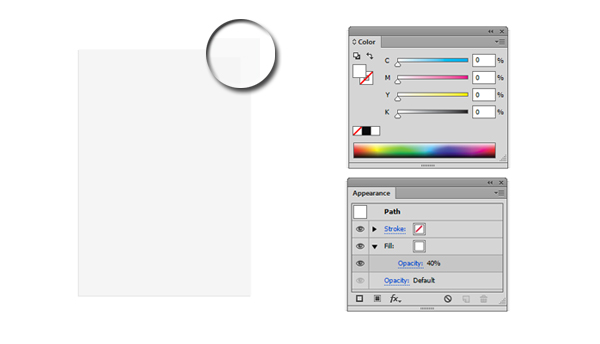
Pick the Rectangle Tool (M) and draw a 350 x 500 rectangle. Fill it with C=0 M=0 Y=0 K=10. Focus on the Appearance Panel, select the Fill and set the Opacity to 40%.
 Step 3
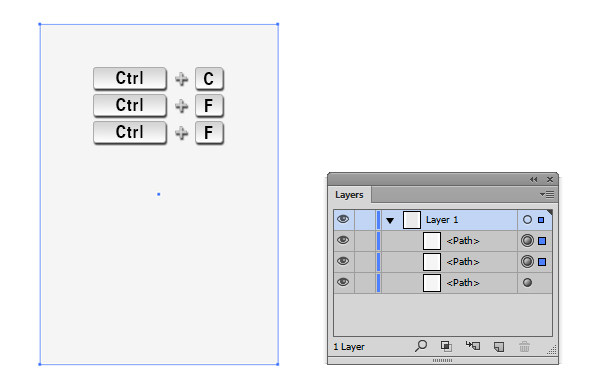
Select the rectangle we’ve previously created and make two copies in front of it (Ctrl + C > Ctrl + F > Ctrl + F).
 Step 4
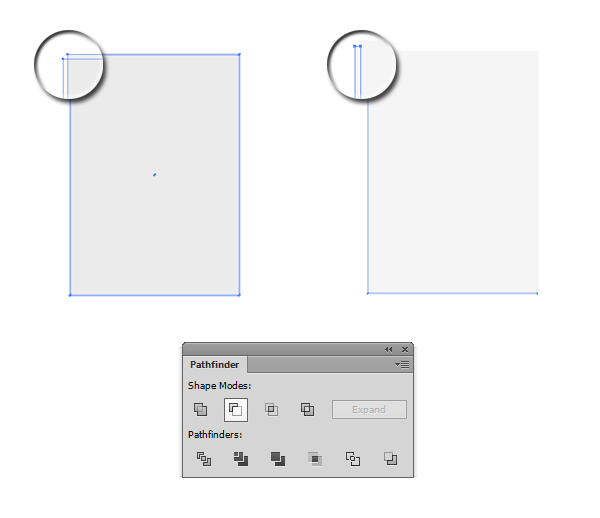
Select the first copy (the one in the middle) of the rectangle, and with your keyboard arrows, move it 2 points to the left and 2 points down. Select both copies and click the Minus Front button from the Pathfinder Panel.
 Step 5
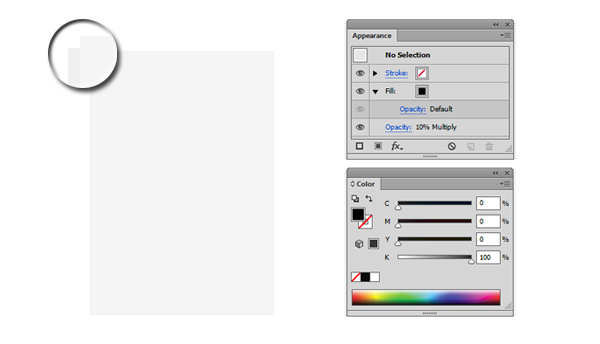
Fill the resulted shape with Black (C=0 M=0 Y=0 K=100). From the Appearance Panel set the Fill opacity to Default (100%) and then lower the Opacity of the shape to 10% with Blending Mode set to Multiply.
 Step 6
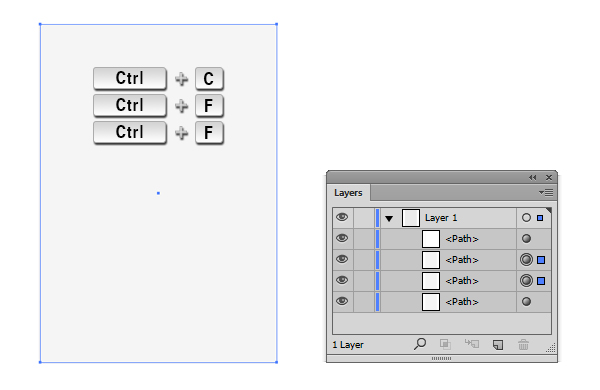
Now select the initial rectangle and again make two copies in front of it (Ctrl + C > Ctrl + F > Ctrl + F).
 Step 7
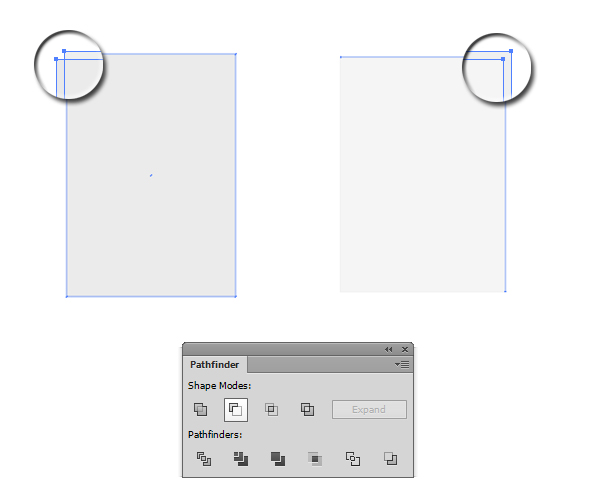
Select the copy that is on top of the others and move it 2 points to the left and 2 points down. Then select both copies and hit the Minus Front button from the Pathfinder Panel.
 Step 8
Fill the resulted shape with White (C=0 M=0 Y=0 K=0).
 Step 9
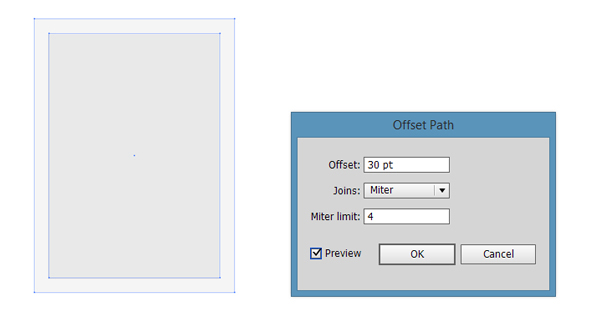
Select again the original Rectangle and go to Object > Path > Offset Path. Enter a value of 30 points, then press OK.
 Step 10
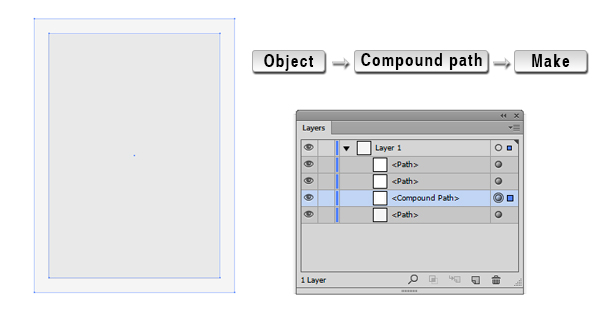
Select the initial rectangle, make a copy of it (Ctrl + C > Ctrl + F). Select the copy and the previously created rectangle with 30 points Offset and go to Object > Compound Path > Make (Ctrl +8).
 Step 11
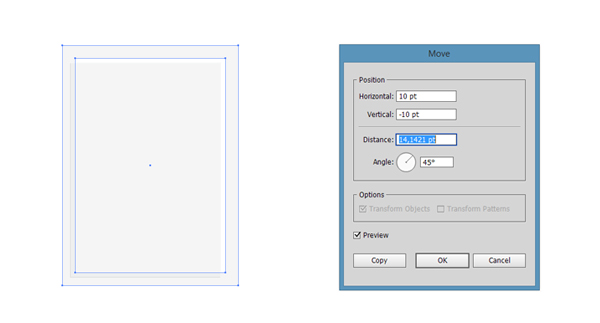
Select the resulted Compound Path and double-click on the Selection Tool (Black Arrow Tool). The Move Panel will appear. Enter a value of 10 points for Horizontal and a value of -10 points for Vertical Position, then hit the OK button.
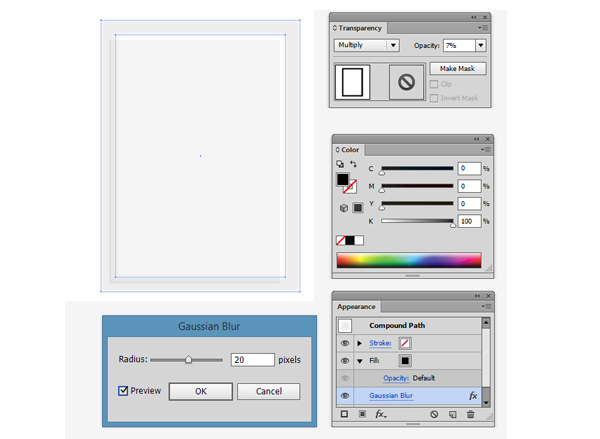
 Step 12
Fill the Compound path with Black (C=0 M=0 Y=0 K=100). Set the Fill Opacity to Default (100%), the Shape Opacity to 7% and the Blending Mode to Multiply. Go to Effects > Blur > Gaussian Blur and enter a value of 20 pixels.
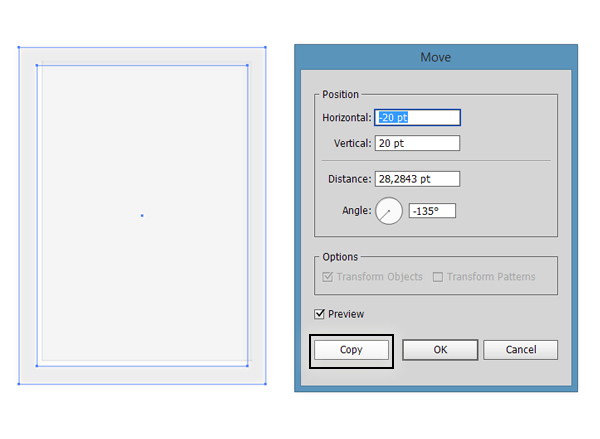
 Step 13
Select the Compound Path again and double-click on the Selection Tool (Black Arrow Tool). The Move Panel will appear. Enter a value of -20 points for Horizontal and a value of 20 points for Vertical Position, then hit the Copy button instead of OK.
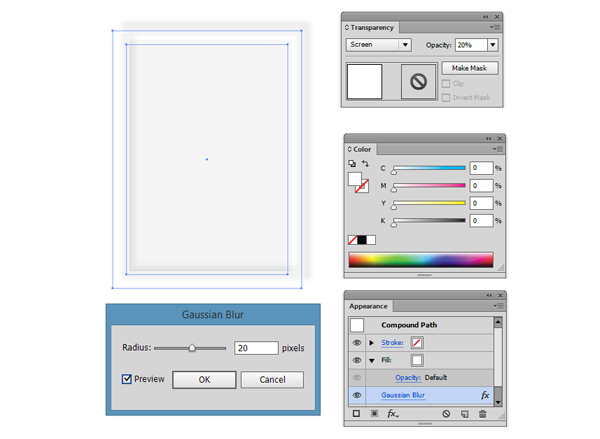
 Step 14
Fill the Compound path with White (C=0 M=0 Y=0 K=0). Set the Fill Opacity to Default (100%), the Shape Opacity to 20% and the Blending Mode to Screen. Go to Effects > Blur > Gaussian Blur and enter a value of 20 pixels.
 Step 15Make a copy of the initial Rectangle (Ctrl + C > Ctrl + F), move it on top of the two Compound Paths, then select all of them.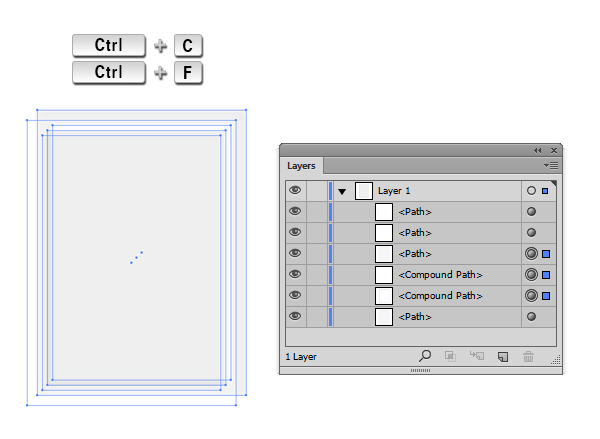 Step 16
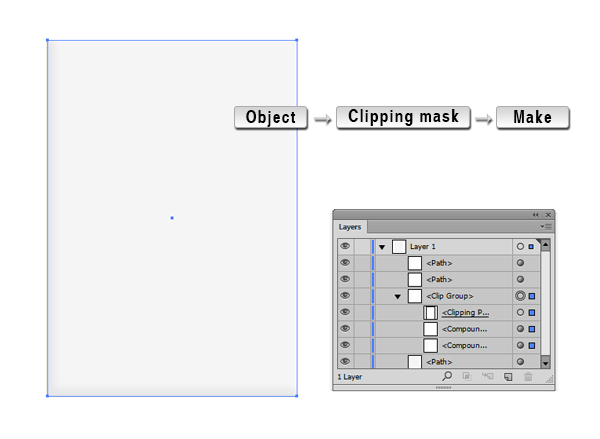
With the three shapes selected, go to Object > Clipping Mask > Make (Ctrl + 7). Now the shades are clipped into a mask.
 Step 17
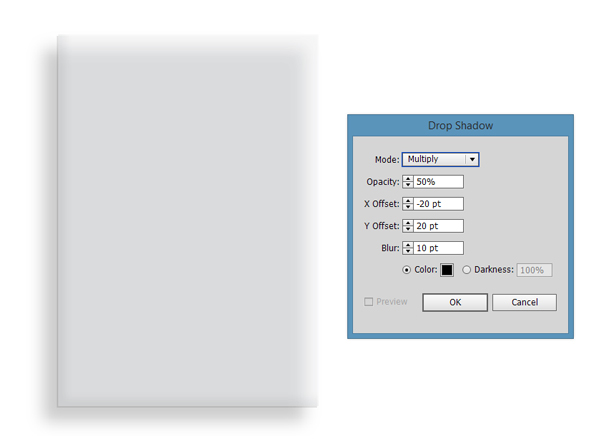
It’s time to draw the shadow of the Plate. Go to Effects > Stylize > Drop Shadow. Set the Mode to Multiply, lower the opacity to 50%, enter a X Offset value of -20 points and a Y Offset value of 20 points. Increase the Blur to 10 points and pick Black (C=0 M=0 Y=0 K=100) as the color for the shadow. Hit Ok.
 Step 18
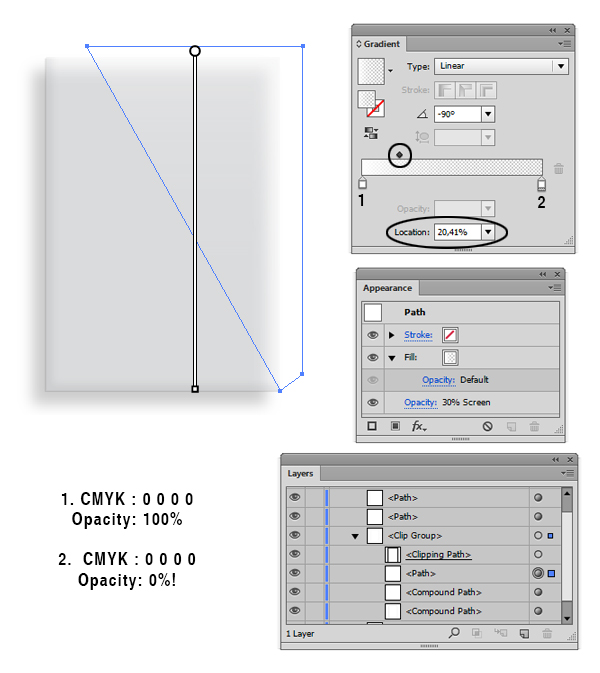
Now let’s draw the highlight of the Plate. Draw with the Pen Tool (P) a shape similar to the one in the screenshot below. Focus on the Layers Panel, select the shape you created and move (drag and drop) the shape into the Clip Group. Make sure that the shape stays selected, open the Gradient panel (Window > Gradient) and simply click on the gradient thumbnail to add the linear gradient. The Right Slider is filled with White (C=0 M=0 K=0 Y=0) and has the Opacity 0%. The Left Slider is filled with White (C=0 M=0 K=0 Y=0) and has the Opacity 100%. From the Appearance Panel change the Opacity to 30% and the Blending Mode to Screen.
 Step 19
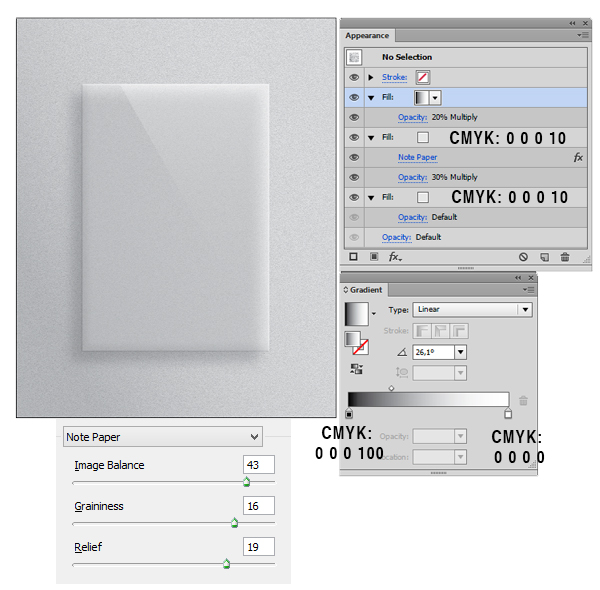
It’s time to create the Background. Draw a Rectangle (M) that fits the artboard (600 x 750 points). Fill it with C=0 M=0 Y=0 K=10. Now add a new fill from the Appearance Panel (Click the Black Square from the bottom of the panel), lower the Opacity to 30% and set the Blending Mode to Multiply. Then fill the shape with C=0 M=0 Y=0 K=10. With the second fill still selected, go to Effects >Sketch > Note Paper and enter the values from the screenshot. Now add a new fill (Click the Black Square from the bottom of the panel), set the Opacity to 20% and the Blending Mode to Multiply. Make sure that the fill stays selected, open the Gradient panel (Window > Gradient) and simply click on the gradient thumbnail to add the default black to white linear gradient; then make sure that the angle is set to 26.1 grades.
 Step 20
Now we are going to finish our illustration by learning how to make the screws using a Conical Gradient. Create a Rectangle (M), then add a multicolor gradient (Window > Gradient):
1. C=0 M=0 Y=0 K=0
2. C=22 M=18 Y=18 K=0 3. C=42 M=34 Y=34 K=0 4. C=14 M=11 Y=11 K=0 5. C=26 M=20 Y=21 K=0 6. C=42 M=34 Y=34 K=0 7. C=14 M=11 Y=11 K=0 8. C=0 M=0 Y=0 K=0 9. C=14 M=11 Y=11 K=0 10. C=42 M=34 Y=34 K=0 11. C=14 M=11 Y=11 K=0 12. C=26 M=20 Y=21 K=0 13. C=42 M=34 Y=34 K=0 14. C=14 M=11 Y=11 K=0 15. C=0 M=0 Y=0 K=0 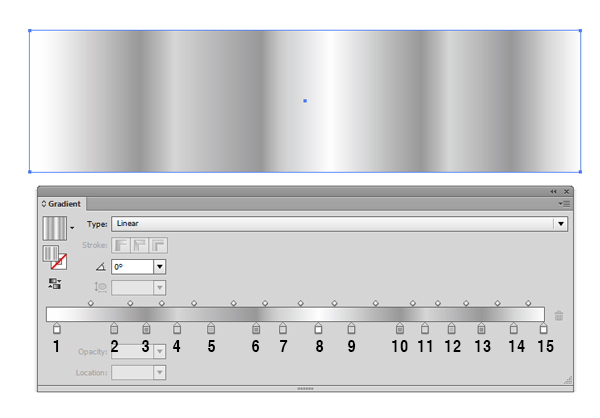 Step 21
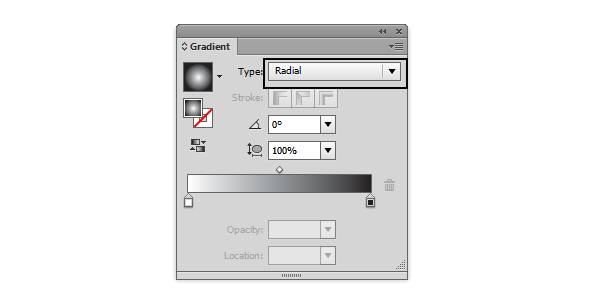
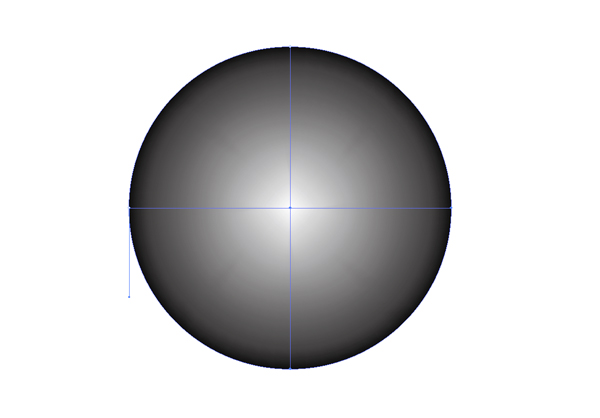
Draw an Ellipse (E) and fill it with a two color radial Gradient (Click Window > Gradient and simply click on the gradient thumbnail to add the linear gradient then change the type of gradient from Linear to Radial, like in the image below). It doesn’t matter what colors you use. With the Ellipse selected, go to Object > Expand and be sure you check Expand Gradient to Gradient Mesh. Then hit OK.
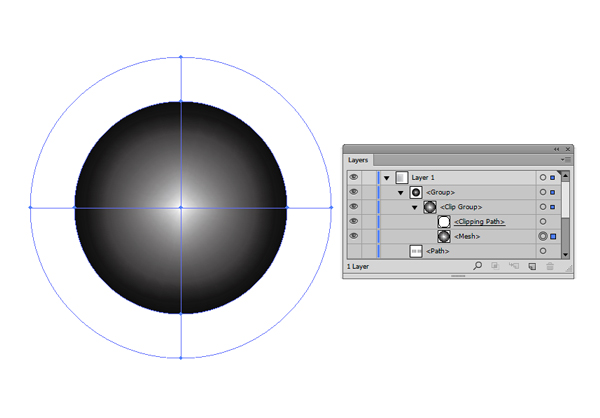
  Step 22
Now we have a Clip Group. Delete the Clipping Path from the Layers panel.
 Step 23With the Direct Selection Tool (A) select the right point on the Inner Circle and delete it (del).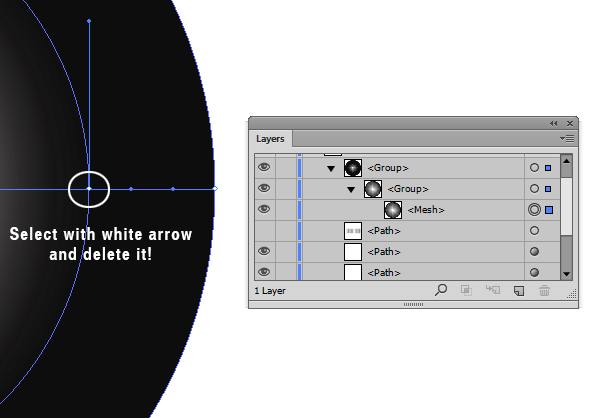
This is the shape that will remain: a Gradient Mesh with 4 points
 Step 24
Go to Object > Envelope Distort > Envelope Options and be sure you have the same properties just like in the image below.
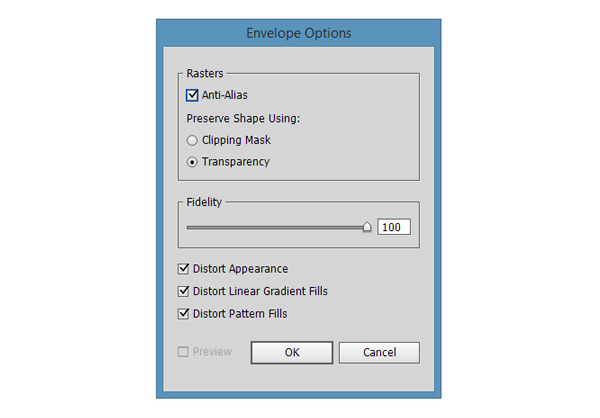 Step 25
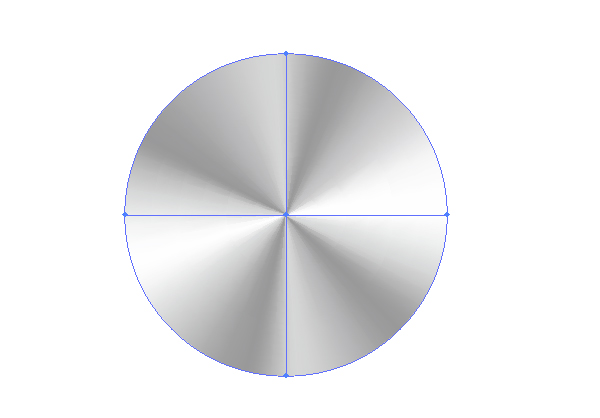
Select both the Gradient Mesh and the Rectangle, make sure that the Mesh is on top by checking the Layers Panel, then go to Object > Envelope Distort > Make with Top Object.
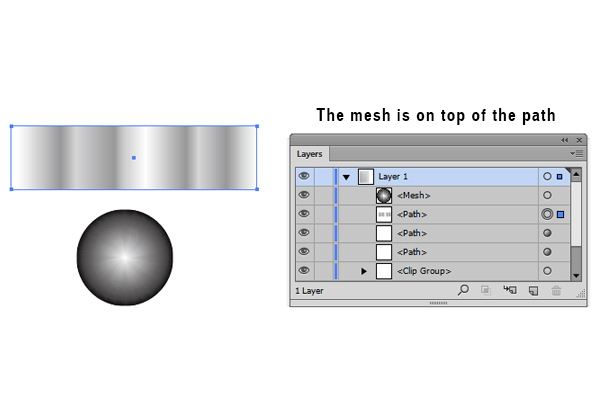
And this is our Ellipse with a Conical gradient that will serve at the screw for our Plexiglas® plate!
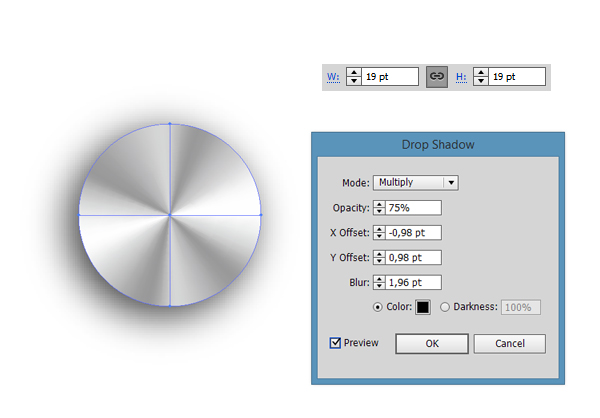
 Step 26
It’s time to add a Drop Shadow to our screw. Firstly, make sure that your screw is 19 points wide and 19 points high. Then go to Effects > Stylize > Drop Shadow and enter the same values as in the screenshot below.
Copy the screw three times (Ctrl + C > Ctrl + F > Ctrl + F > Ctrl + F) and arrange them like the screenshot below.
And we’re done!Author: Andrei UrseMy name is Andrei Urse. I’m a graphic designer from Romania. I love creating logos and complex vector art using Illustrator, but I also use Photoshop and InDesign on a daily basis. You can find all of my work on Behance.The post Create a Realistic Plexiglas® Plate Vector appeared first on Vectips. |
|
Posted: 13 Aug 2015 04:08 PM PDT
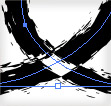
I like scanning a bunch of different brush strokes to create custom Illustrator Art Brushes. When I create these brushes from the outlined scanned artwork I sometimes get this weird overlapping effect that’s really annoying. I’ve been hunting around for a solution and finally found one. To be honest, I’m not really sure I understand why it works, but it does, so I guess that’s fine.
The ProblemTake a look at the image below from a scanned custom Art Brush I made. See were the path overlaps and you seen the reversed effect? That’s what I don’t want to happen.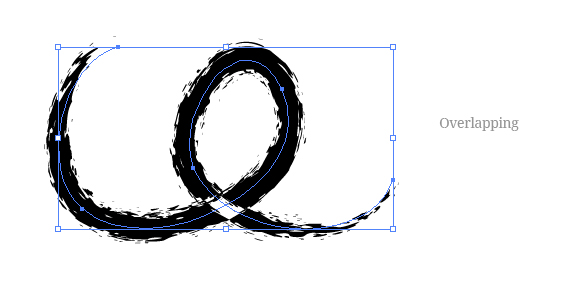 The FixThe fix is pretty easily, but again, I’m not complete sure what Illustrator is doing or what these functions mean.Select the artwork you’re going to create the brush with and from the Attributes panel select the Non-Zero Winding Fill Rule. Now create your Art Brush like normal and your good to go! Weird, right? 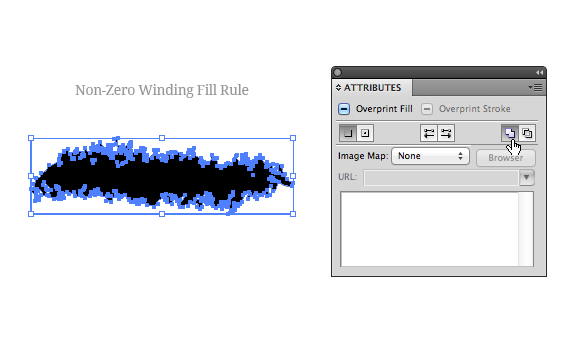 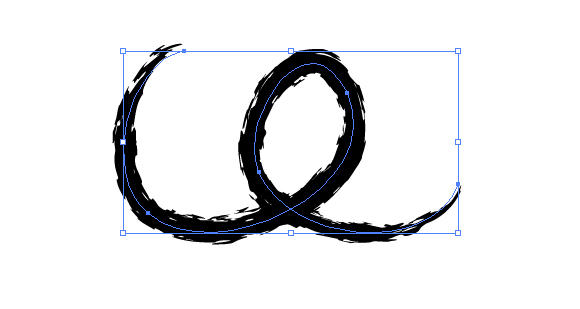 |
Subscribe to:
Posts (Atom)