In this tutorial, we’ll find out how to create a realistic vector leaves which can be always used in your future projects. This leaf is essentially universal, i.e. you can always change its color and form. It might seem to you that it’s created with the help of the Gradient Mesh. But nope, it’s not the case. I used plain gradient fills. Would you like to learn how to create such leaves? Then put all your businesses aside and let’s draw!
Tutorial Details: Realistic Vector Leaves
Final Image: Realistic Vector LeavesAs always, these are the final Realistic Vector Leaves that we'll be creating: Step 1To begin with, create a new document (File > New…). Dimensions of our artboard are not significant, since we’ll create one vector element which you can use in different artworks in the future. Click on button Advanced and set the RGB color mode, if of course, it is not installed by default.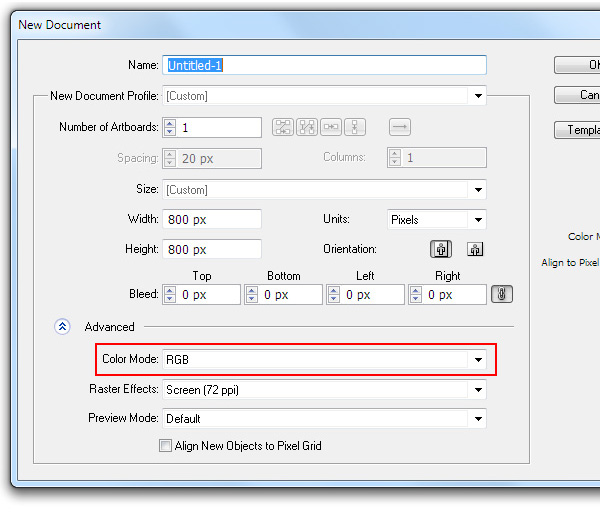 Step 2Take the Ellipse Tool (L) and create an ellipse of any size, which looks similar to the one you see on the figure below.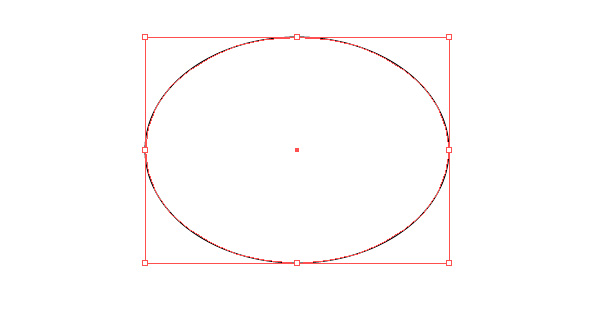 The colors of the fill and the stroke are unrestricted, since first we create necessary forms, which will be colored later. Take the Direct Selection Tool (A) and select point A. Now, while holding down the Option/Alt key, turn one of the handles of point A. 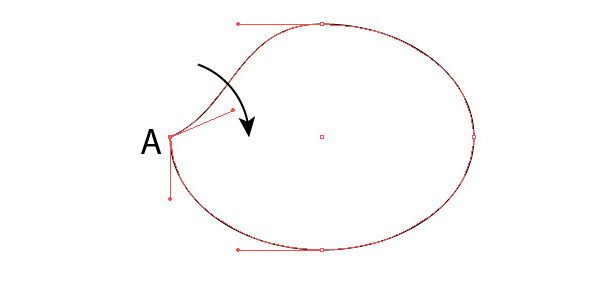 These actions will lead to the transformation of smooth point into a corner one. Step 3Perform the same actions with point B of our object.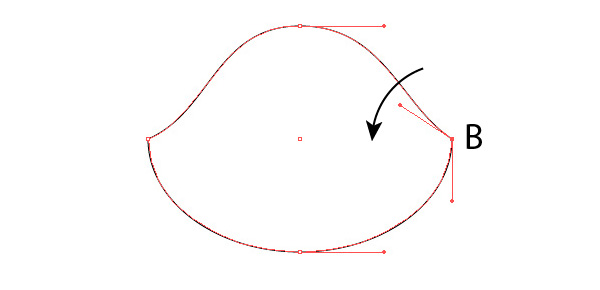 And now while manipulating with the location of the points and its handles, give the object the form of a leaf as it is indicated on the figure below. All the actions are performed with the help of the Direct Selection Tool (A). 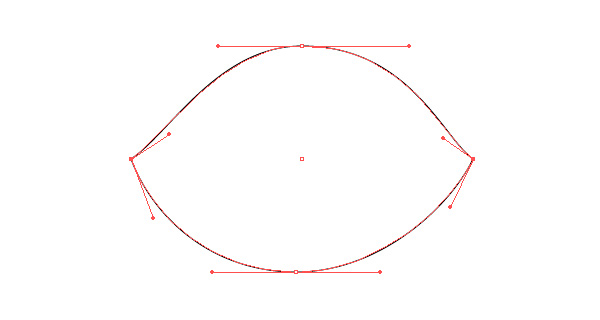 Step 4Take the Pen Tool (P) and create a curved segment that passes though the points A and B.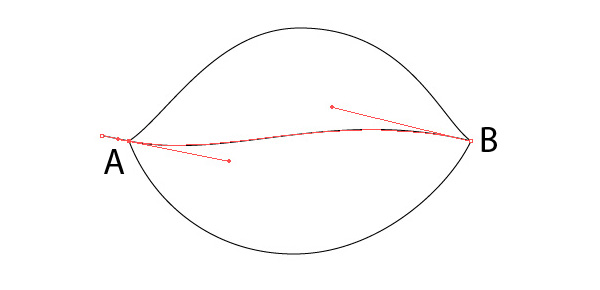 Select all the created objects, then click on Divide in the Pathfinder panel. 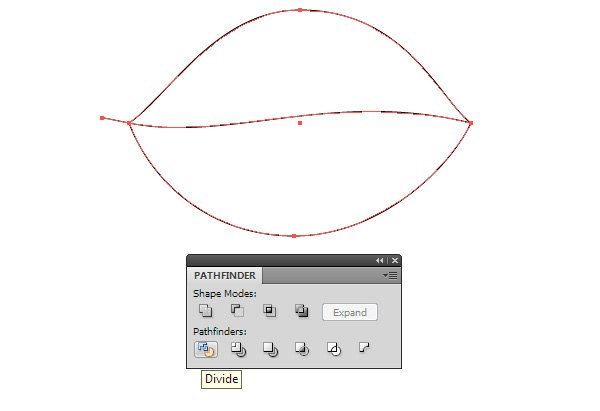 These actions will divide the leaf’s form into two parts. 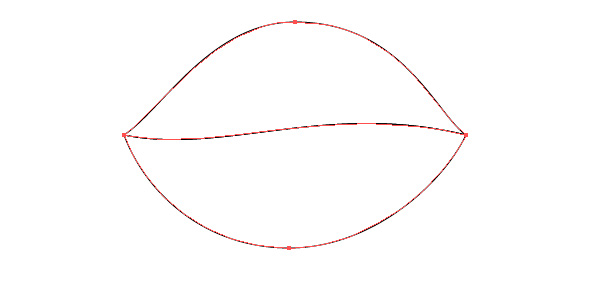 And now we can start coloring its halves. For our convenience, we ungroup them (Shift + Command/Ctrl + G). Step 5Typically, the Gradient Mesh is used to create complex color objects, but a lot of users and even advanced designers try to avoid the usage of this function because of usage complexity and management. I perfectly understand the problem they face–that’s why I suggest another method. And namely, I suggest to use the Appearance panel to create light-and-shade in the halves of our leaf. The work with color is always very challenging to describe since it is a long journey of trials and errors. Therefore, I give you exact designations of colors, and what effect I’m trying to reach. Fill the lower half of the leaf with radial gradient from green (R = 110, G = 194, B = 36) to green (R = 72, G = 163 B = 4). Now using the Gradient Tool (G), shift the center of the radial gradient by clicking and dragging off the center. We need to place the center of the radial gradient in such a way that the left corner of the leaf was lighter in color.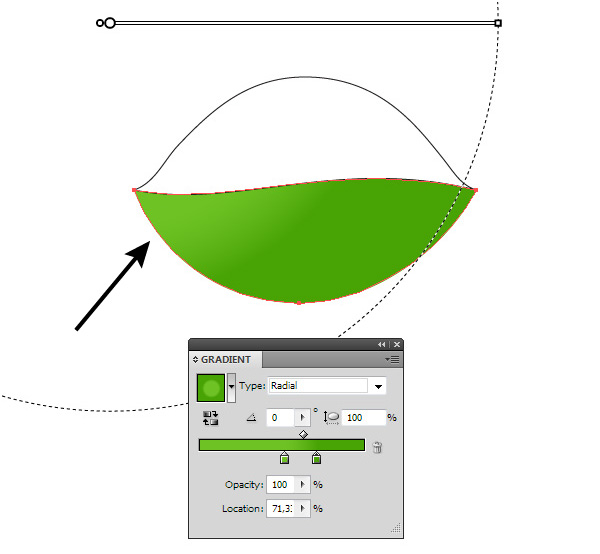 Step 6Open the Appearance panel (Window > Appearance) and click on the Add New Fill button in the bottom part of the panel.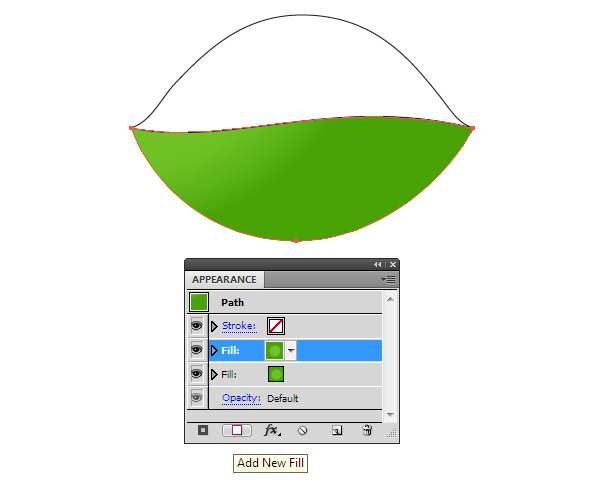 Change the colors of the radial gradient of the new fill to green (R = 37, G = 138, B = 0) for the left slider, and green (R = 81, G = 173, B = 4) for the right slider. For the right slider, set 0% opacity in the Gradient panel. And now shift the center of the radial gradient with the help of the Gradient Tool (G) to darken the middle part of the leaf. 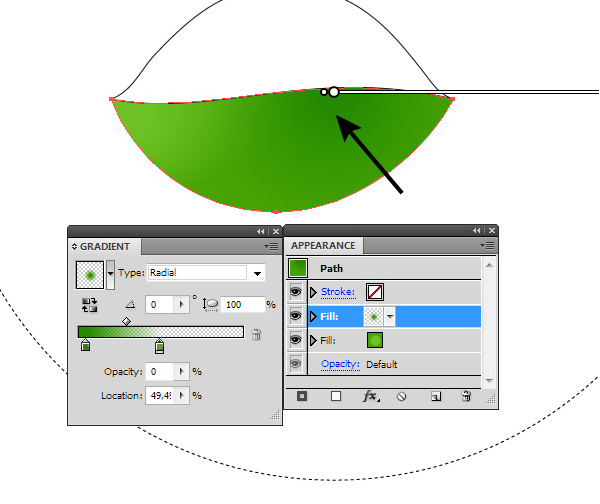 Step 7Create a new fill in the Appearance panel. Radial gradient of this fill has the following colors: green (R = 118, G = 196, B = 37) for the left slider and green (R = 61, G = 130, B = 3) for the right slider. The right slider has 0% opacity. The center of the gradient should be placed to lighten the right corner of the leaf.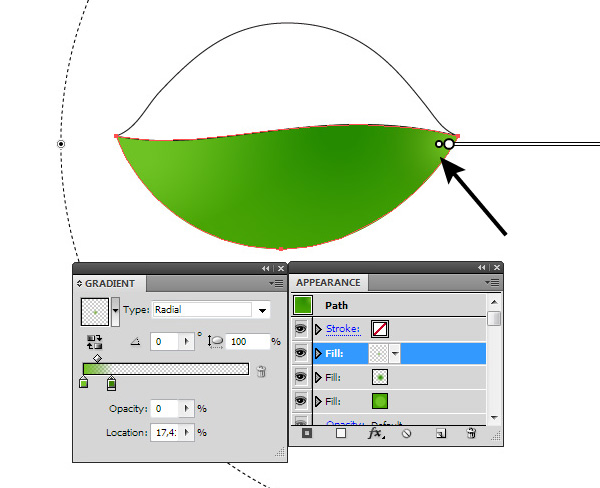 As you can see, the use of the Appearance panel and gradients with transparent sliders allows us creation of complex color transition.  Step 8We worked only in green, but look how different the numbers corresponding to its shades are! Logically, it is clear that numbers of shades of one color should not differ dramatically. Fortunately, there is an intuitive color model which helps to get the right color quickly. This is the HSB color mode. I use this model to mix colors. And if you want to get your own colors and not just copy the colors that I received, then switch the color model in the pop-up menu of the Color panel. Here I want to note, switching the color model in the Color panel won’t change the color mode of our document. Step 9Using this technique, color the upper part of the leaf. Fill the form with linear gradient from green (R = 7, G = 120, B = 0) to green (R = 68, G = 173, B = 0). Step 10Add a new gradient fill in the Appearance panel. This radial gradient consists of the following colors: green (R = 81, G = 173, B = 4) for the left slider, green (R = 8, G = 122, B = 0) for the central slider, and green (R = 81, G = 173, B = 4) for the right slider. The central slider has 0% opacity. This gradient lightened the central upper part of the leaf. Step 11And finally, we create one more fill in the Appearance panel. The new radial gradient consists of two colors. These are green (R = 9, G = 130, B = 0) with 0% opacity for the left slider, and green (R = 65, G = 140, B = 3) for the right slider. The center of this gradient must be placed so that it darkens the edge of the leaf. Step 12With the Pen Tool (P), create a form of a stem as it is indicated on the figure below. Fill the created form with linear gradient from green (R = 100, G = 176, B = 33) to green (R = 72, G = 163, B = 4).  Step 13Copy the stem’s form and then paste it to the front (Command/Ctrl + C; Command/Ctrl + F). Change the location of the points’ handles so it becomes thinner than the original. Fill this form with radial gradient from green (R = 114, G = 204, B = 37) to green (R = 72, G = 163, B = 4). The upper object is a gleam on the surface of the stem.  Step 14Create a new form using the Pen Tool (P). It should be a little wider than the stem and should repeat its form. Place the object below the created stem’s elements. Fill this form with linear gradient from green (R = 0, G = 92, B = 40) to green (R = 61, G = 138, B = 3). The object created in this step is a drop shadow for the stem. Step 15Let’s work on creation of veins on our leaf. Take the Pencil Tool (N) or the Pen tool (P) and create a wavy line with the black fill. Apply to this path a triangular profile in the Stroke panel. There you can also adjust its width by changing the Weight parameter.  Step 16Create the rest of the veins on the upper part of the leaf, then group them (Command/Ctrl + G). Place the group underneath the stem. Now apply the Screen blending mode in the Transparency panel to the group.  The veins became transparent, but no worries please. We’ll fix it right away. Step 17Turn the Grayscale color mode in the Color panel, then reduce the K value to get the desired intensity of the veins’ color. Hide edges of the paths (View > Hide Edges or use the Command/Ctrl + H shortcuts) so nothing prevents us from color management. Using this technique, create some veins on the lower part of the leaf.  Step 18Under the influence of some environmental factors, some spots can appear on leaves in nature. So to help these look more natural, using the Pencil Tool (N) to create objects which look similar to the ones you see on the figure below. Apply to these objects the Screen blending mode in the Transparency panel, then choose the desired color intensity by controlling the K parameter in the Color panel.  Step 19Select the halves of the leaf and the spot forms, then take the Shape Builder Tool (Shift+M) and while holding the Option/Alt key, click on the parts of the spots which extend beyond the form of the realistic vector leaves, which leads to deletion of these parts.  Step 20With the help of the Pen Tool (P) create dark-grey and white objects. These objects should be placed underneath all of the leaf’s objects. The forms of the objects and their position towards the leaf is indicated on the figures below.  Select both forms, then go to the Object > Blend > Make or use the Command/Ctrl + Option/Alt + B shortcuts. In order to set the desired value of specified steps, go to the Object > Blend > Blend Options… or simply click twice on the Blend Tool (W) icon in the Tool panel.  I usually set it to less than 30 steps since the number of steps enlarges the size of your vector file and slows down the application in process. Step 21Select the blend object and set the Blending mode to Multiply in the Transparency panel. This gives your blend object transparent edges so we can place it on any color background. Step 22The techniques that were used in this tutorial, in fact allowed us to create a universal leaf that can be re-colored very quickly to create additional leaves. To do so, open the Appearance panel, select the fill and edit the gradient. We can change the colors and location of gradients, which gives us an opportunity to control the lighting of the object. Moreover, we can easily change its form without breaking a complex shading, for example, with the help of the Pencil Tool (N) as in the image below.  Realistic vector leaves are very popular design elements. Check out yourself how they can be used.  I hope you were able to complete this Realistic Vector Leaves tutorial. I’m always ready to help when you have any difficulties. All you need to do is to write your questions in comments to this tutorial.  Author: Iaroslav LazunovMy name is Iaroslav Lazunov, I am a graphic designer from Ukraine. I am glad that I finally found the job in my life that I can share my knowledge and experiments with you in my tutorials. Follow me on Twitter or visit my blog Vectorboom.com. |
