Staying creatively inspired all the time is not easy. Most people working on the creative industry has experienced the feeling of getting stucked at any point of an on-going project.
Breaking through a creative block is the first step, but still, many are having the problem of keeping the flow of creativity. Fortunately, there are various ways and techniques to boost one’s creativity. Here are some creativity boosters that might help you: 1. Think INSIDE the box.  Most of us might probably heard the advice “think outside the box”. But when keeping that creative spark, this will not be the best advice to consider. Setting restrictions or guidelines refine your problem, giving rise to undiscovered possibilities that might be useful in making the most creative solution to your problem. Limiting yourself to specific guidelines and requirements brings out your most creative side. 2. Take risks.  Creative people dare to take risk that make them remain creative. Most part of creativity is trying out new things with unpredictable outcomes. Not knowing the outcome will challenge you to exert more creative ideas for better result. 3. Do the opposites.  If you are a digital painter, try to draw on paper. If you design in black and white, try something done with color. The escape from your comfort zone can free your mind and develop new ideas. 4. Use the “What If?” technique.  What if I switch the colors? What if I use a darker background? What if I use a different typeface? Exploring possibilities by letting your mind wander opens new opportunities for more creative ideas. 5. Visualize images in mind and widen your imagination.  Imagine. Having the skill to easily visualize ideas in the mind can be achieved through a lot of ways: reading fiction, watching sci fi films or playing video games. 6. Use mind maps.  Explore the topic or problem by creating a mind map through a group brainstorming. Filling up a blank sheet of paper with your growing ideas will make way for better creative concepts. 7. Spend time with nature.  A change in the environment helps a lot in keeping the creativity flowing. Spending time alone under a tree or watching the ocean waves will recharge your mind and get back to work with more creative and fresher ideas. |

Sunday, June 30, 2013
7 Effective Creativity Boosters
Saturday, June 29, 2013
Create 3D Pixel Art in Illustrator
Yes, you read that title correctly! I understand this tutorial title kind of seems like an oxy-moron. We are combining one of the most primitive and limited graphic techniques edited on a pixel level, with the modern sleek aesthetic of 3D effects. But the result is a juxtaposition so rockin it kicks you straight in your nostalgic keister!
Okay……okay…..I’m the first to admit that Illustrator’s 3D effects are kind of like an old dog that knows 3 tricks, and that dog has three legs. I’m totally fine with that! I love Illustrator for its clean vector graphics . Consequently the 3D in Illustrator has turned into that thing I like to fool around with, but never use for actual design jobs. I was pleasantly surprised one day while applying Illustrator’s Extrude command to pixel art. I realized, that three legged dog still has some tricks up its sleeves when a little creativity and unconventional software use is combined. Below we have the results of the techniques used in this tutorial. Lets get to it and create some vector nectar! Tutorial Details
Final Image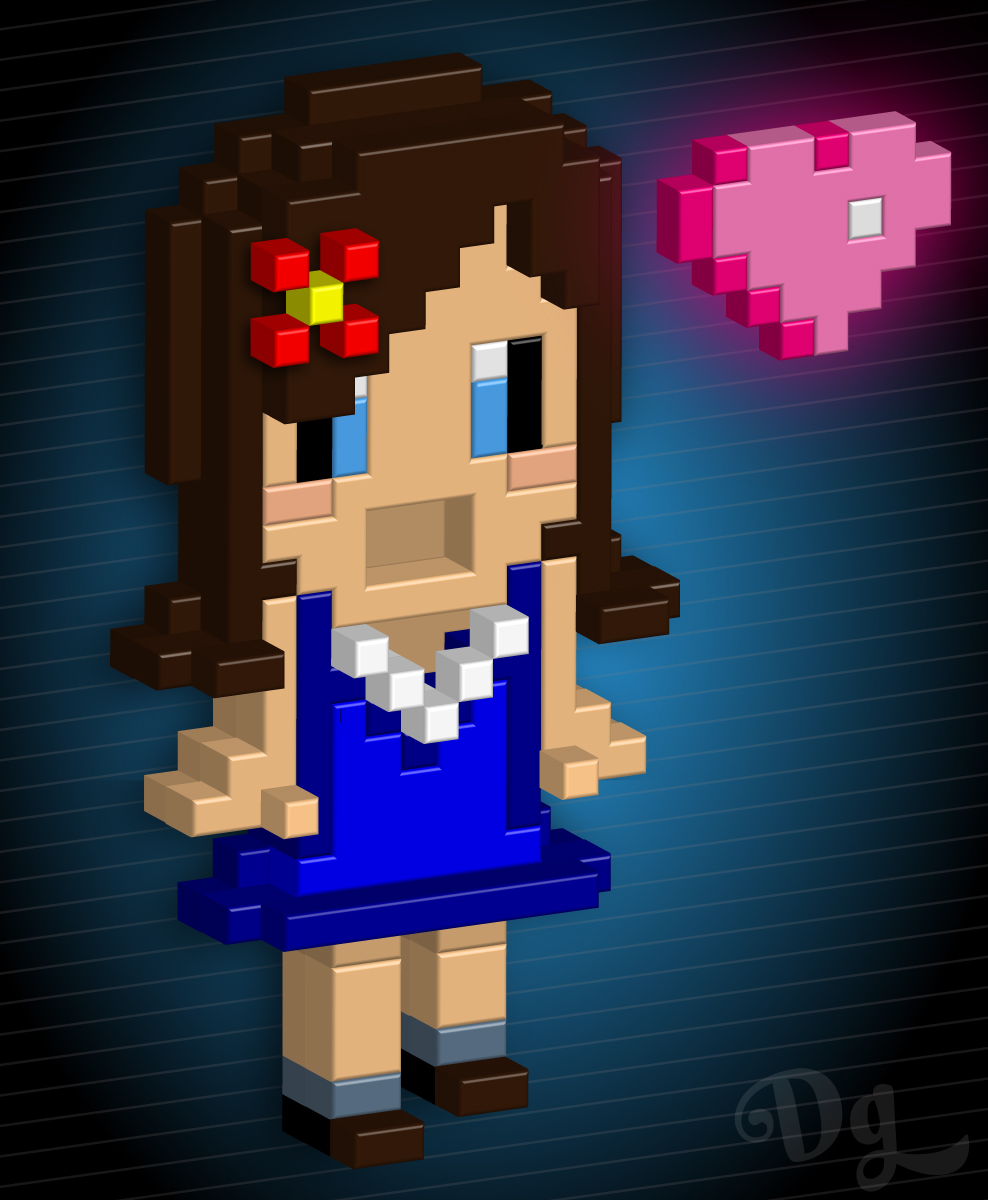 Step 1Lets start by creating a new document and template image for our pixel art. For this tutorial you can go ahead and copy/paste the character sprite I made of my lovely pixelated wife Lora. Once you understand the techniques to create 3D pixel art you can create your own characters or use your favorite classic video game characters!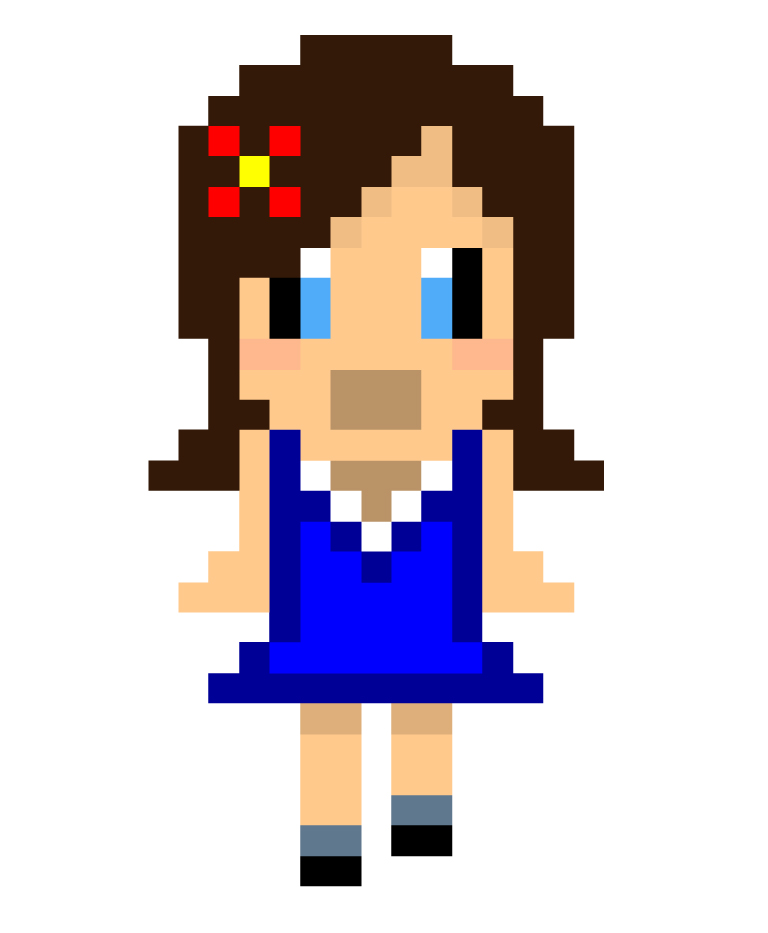 By double-clicking the image thumbnail of the layer you posted the image in, you can enable the layer as a template. This will automatically lock and dim the layer to 50%. How convenient! 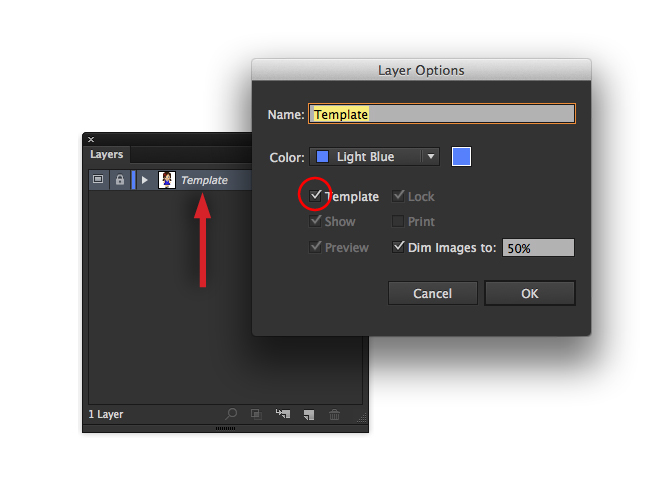 Step 2Once your template is in place, it is time to create a grid directly over our template layer. Lucky for us, Illustrator has a tool that will create grids for us! You will find the Rectangular Grid Tool under the Line Segment area of the Tools Panel. Hold the mouse down on the line segment tool to access a fly out panel which contains our desired tool. In the wink of an eye the Grid tool will turn from a lonely useless Illustrator tool into a champion of possibilities! Once available, double-click the Grid Tool icon in the Tools Panel to access the tools options. Set the horizontal dividers to 27, and the vertical dividers to 14. In a new top layer, drag the grid from one corner of the template to the other. Holding space bar while dragging will allow you to move the grid before placing it. Once your grid is placed over your template as pictured (pixel to pixel) it will be time to start creating pixel art!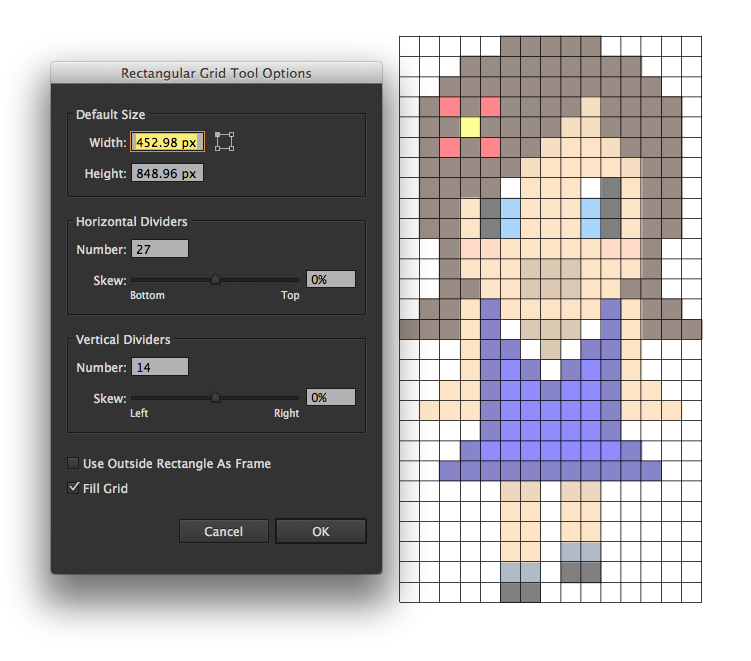 Step 3Select your grid and hit shortcut “K” on your keyboard to access the Live Paint Bucket. Hover the bucket over the grid and click to create a live paint grid. Now we shall paint! You can sample the colors of the template underneath by using the Eyedropper Tool. You can toggle between shortcuts “i” and “k” until your retro masterpiece is complete. Since our template is dimmed, we can see what the heck we are doing. If you mess up, you can set your color fill to none “/” to erase your boo boos.Once you’r finished, select it again and hit shortcut “/” on your stroke to eliminate the stroke on the grid.  Step 4If you are only interested in creating pixel art in Illustrator you can stop right here. But, if you want to add a few more design wizard creds to your ever expanding repertoire we must continue into the world of 3D! Altogether we are going to need a total of 4 different pixel sprite layers to complete our 3D design. Things are going to get much more complex from here. In order to get the best looking 3D design possible we are going to need to imagine our layers stacked in 3D space while we are designing them. If you have difficulty imagining things in 3D space then try this simple analogy. Imagine each one of these layers pictured below are flat Lego figures built out of square shaped pieces laying flat on the ground . When we subsequently stack each layer directly on top of the last eventually we have a completed figure with extra depth and unique grooves.Create these 4 separate pixel sprite layers exactly as shown. One wrong pixel can create an incorrect looking design. Pay extra close attention to the necklace and neckline in the 1_Bottom layer as well as the transparency in the neckline and mouth in the 2_Middle layer. Those transparent parts are very important. Don’t forget the whites as well! For the rest of the tutorial I will be referring to these layers by the title I have given them in the layers panel. Step 5Once we have completed the four different pieces and have placed them in their respective layers we can try out Illustrator’s Extrude & Bevel effects on our pixel art.Select the 1_Bottom layer and go to Effect>3D>Extrude & Bevel. When we select Preview in the bottom left of the panel, we can see the effect applied to our pixel art. I havn’t changed any of the default settings in this example except for Extrude Depth and a Tall-Round bevel. I’m not going to go into all the details of the Extrude and Bevel options in this tutorial. You may experiment with the parameters to create what you feel are the best aesthetics for your pixel art. Notice how your pixel art has each and every pixel block defined. If you like this effect you can go with this and ignore Step 6. If you want to have solid pieces like the final art I created then proceed to the next step. 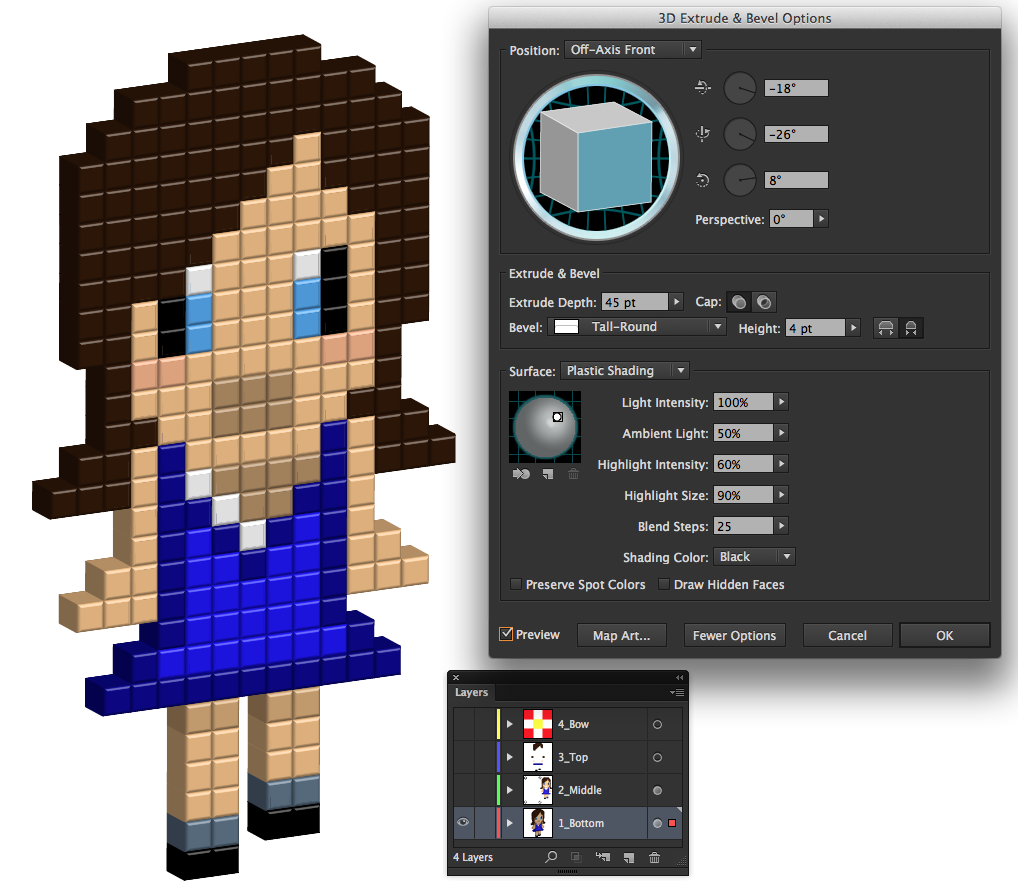 Step 6To create solid pieces defined by color in our pixel art we are going to put the Pathfinder to good use. Select your pixel art and go up to Object>LivePaint>Expand. With the art selected press shortcut Command(Ctrl)/Shift/G to Ungroup all of our individual pixels.Double-click the Wand Tool to bring up the tool’s options. Make sure Fill Color is selected and your Tolerance is low. With our pathfinder ready we can now select each color group with the wand and Unite them as a solid piece with the Pathfinder’s Unite Shape Mode. Make sure your other layers are locked or hidden or we inadvertently group pieces of our various layers together. Once the layer is finished make sure the art is selected and re-Grouped by hitting shortcut Command(Ctrl)/G. This will keep the 3D effect from from doing funky things.  Step 7Now when we apply the Effect>3D>Extrude & Bevel we can see the new difference. Once again you may fiddle around with the parameters how you wish to give your art a good aesthetic.I will take this time as well to remind you that Illustrator’s 3D effects aren’t really the “End-all, Be-all” of 3D effects. So you may see some strange things especially since we are using the 3D in a somewhat unconventional way. You may get some artifacting and an occasional strange line. As you can see pictured in the left shoulder of my art. These can be easily remedied in our final product by creating some rectangle shape “patches” of the same color, or our final art can patched up later in Photoshop. 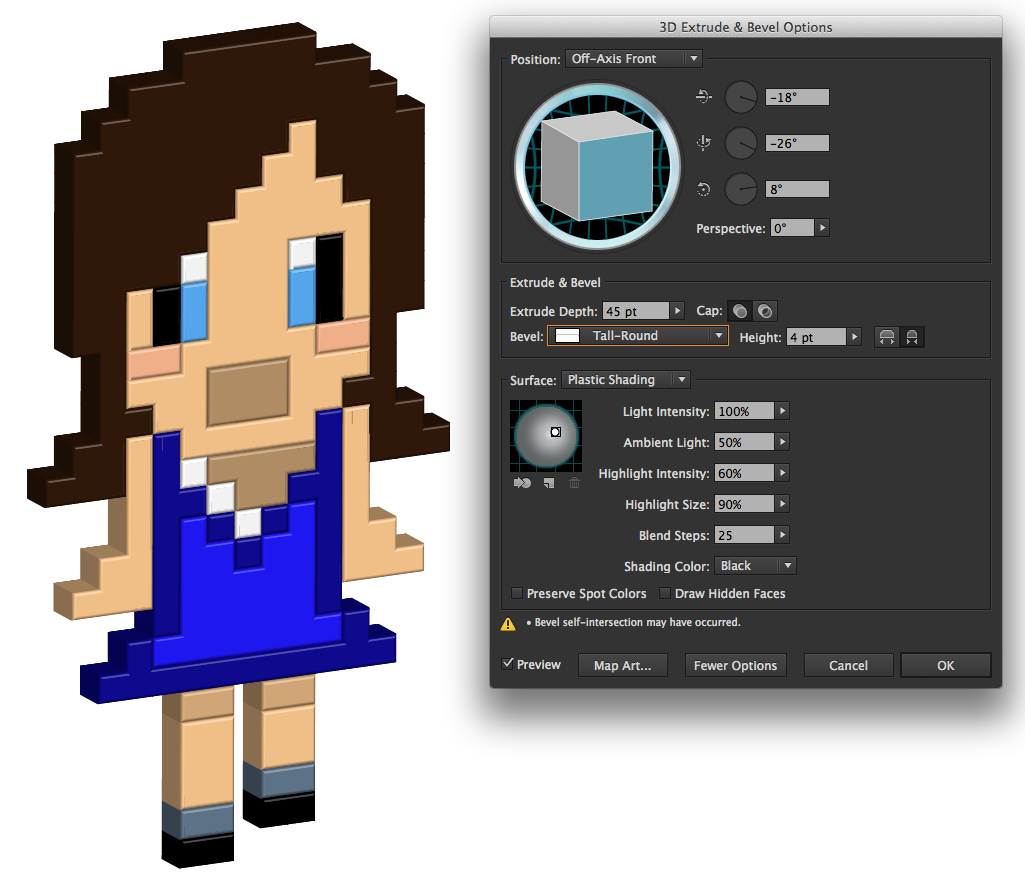 Step 8Once you have your desired look you can apply the same effect and parameters to the 2_Middle layer. Place this layer directly over the 1_Bottom layer. You can use the Arrows on the keyboard to nudge the art up just right. Now you can start to see the great depth our pieces create when stacked up on each other. Look at the negative space areas of the mouth and neck! Rad!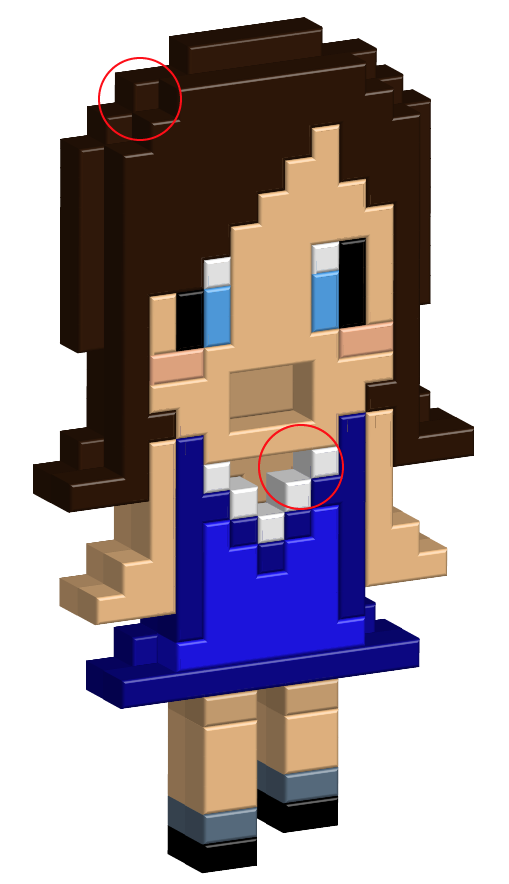 Step 9In our final step we will repeat Step 8 on our remaining layers. You have now created 3D pixel art in Adobe Illustrator!Finish up your art by creating a background and other characters or elements to your composition. Drop shadows can also be applied to these 3D layers for extra depth. Pat yourself on the back Vector Cadet!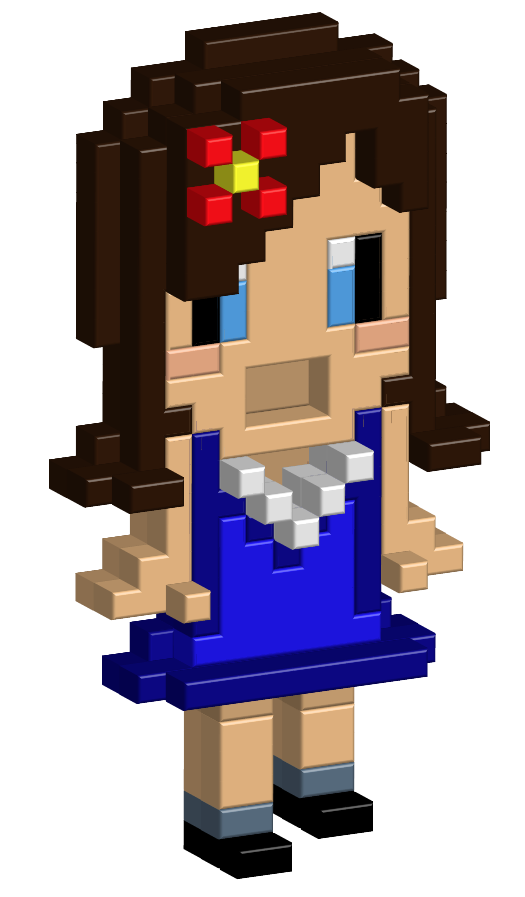 Tutorial by Dan GradyDan Grady’s Internet Stuffs |
Friday, June 28, 2013
Creative Advertising Ideas
It’s the end of the week again and that means we here at You the Designer are counting down the best creative advertising ideas for your inspiration!For this edition of Creative Advertising Ideas we are going to list down the winners of this year’s Cannes Lions. For those who don’t know what the Cannes Lions is, just think of it as the Oscars of Advertising. With so many entries coming in from agencies around the world, getting a Cannes Lion award is one of the biggest and most prestigious award a advertising practitioner and agency could ever hope for. The festival started last Sunday (June 16) and will be concluded this Saturday (June 22).Before we start our list we here at You the Designer would like to commend the people behind of each entry for this year’s Cannes Lions because having a work shortlisted in such a prestigious event is no small feat. 1. Winner of Promo & Activation Lions Grand Prix — Immortal Fans
(Source)
  
Brazil is known to have the most passionate fans and Sport Club Recife is known to have the biggest and most loyal fans. Even to the point of from birth to death. This is why Ogilvy Brazil created the Immortal Fans, the campaign aims to promote organ donation which is a touchy topic in Brazil. The emotional tug of Immortal Fans help increase organ donation by a record breaking 54%!
2. Winner of Direct Lions Grand Prix — Dumb Ways to Die
(Source)
 PSAs have never been the same ever since Metro Trains released the viral video Dumb Ways to Die. Despite it’s cute and adorable facade the video showcases a series of macabre and (wait for it!) dumb ways of dying. This radical approach is to enforce the message that people should be much more careful around trains in order to reduce railway accidents. 3. Winner of Media Lions Grand Prix — Dela
(Source)
   It is probably safe to say that one of the toughest product to sell is a Funeral Plan because no one or at least many of us are very uncomfortable to the idea of planning a funeral let alone a love one’s funeral. Dela is a Funeral Insurance company in the Netherlands started a simple and yet heart-warming campaign entitled: Why Wait Until It’s Too Late? What they did is that they gave ordinary people a chance to say something wonderful to the people they really care and cherished a lot. While the speech was given a crew has setup 6 hidden cameras wherein the taken footage was used to develop commercials with real emotions. The commercials are just part of a integrated campaign wherein real people are tasked to tell their love ones what they really feel. 4. Winner of Cyber Lions Grand Prix — Oreo
(Source)
 
Looks like Oreo has becoming a staple feature in Creative Advertising Ideas. To celebrate Oreo’s 100th birthday they created the campaign Oreo Daily Twist. Everyday a team will scour the internet to find something relevant and create a different twist using Oreos as their main visual for 100 days.
5. Winner of Design Lions Gold — Haelssen & Lyon
(Source)
   Combining the oldest drink in the world with the oldest advertising medium is what top European tea merchant Haelssen & Lyon did for their creative advertising idea. Creating the calendar’s pages from tea leaves is no small feat because the tea leaves has to be a millimeter thin but it has to be robust and can be easily dissolved into hot water at the same time. What’s more interesting is that no calendar-page is of the same tea flavour. |
Wednesday, June 26, 2013
Firefox OS Brand Mascots by Martijn Rijven
Firefox OS (also known by its codename “Boot to Gecko” or “B2G”) is an open source mobile operating system of Mozilla based on Linux and their Gecko technology. The first version was released last February 2013 with codename TEF and Gecko 18 version.
Part of Mozilla’s campaign for the OS brand was the creation of Firefox mascots used in its advertisements and branding. YTD is very honored to get in touch with one the creative minds who conceptualized the creation of the brand mascots. Check out our interview below with Dutch designer, Martijn Rijven about his work on the series of illustrations for the Firefox OS branding.  YTD: Hi Martijn, welcome to You The Designer! Share us a little background about you and your design work. MARTIJN: Hi, thanks for having me.Well my name's Martijn Rijven, I live in Amsterdam, the Netherlands and I have a lovely wife and daughter. In 1997 I graduated in graphic- and typographic design from the Royal College of Arts in The Hague and I've, for the most part, been self employed ever since.  Dutch Designer, Martijn Rijven I run a one-man company under the name of BOLTgraphics, in which I specialize in graphic, typographic and illustrative design. It seems quite broad for a specialisation but for me those three always seem to blend into one another. YTD: Who or what are your major influences in design? MARTIJN: That's tough to answer as I enjoy different designs (designers) for such different reasons, and I think they influence my work as much as everything else I take in. Having said that, I have found that I'm a real sucker for craftsmanship so the illustrators and designers from around middle of the last century seem to spur me on into improving myself the most. Designers like Paul Schuitema and Jan Tsichold but also Wim Crouwel and illustrators like Robert Fawcett and Charley Harper.  Various works by Martijn Rijven YTD: How was it working with Mozilla? MARTIJN: It was great. I didn't have too much contact with Mozilla directly though. I was commissioned by Wolff Olins in New York who were designing the brand of which my mascots were a part. They would present my work to Mozilla, but Mozilla did seem like a client that was open to new ideas and was willing to learn.  YTD: The Firefox OS Brand mascots are awesome! How did you landed on this project? MARTIJN: Thanks so much! Well, as I said I was commissioned by WolffOlins and their creative director on this project, Mike Abbink, is someone I had work with on similar projects in the past. He got me involved with this project.  YTD: Can you share us your creative process? From where did you start? MARTIJN: Well whenever I work with Mike he just let's me start out with sketching. A lot of sketching. Exploring all possible poses, abstractions, stylesations. And after a goof 4 days of just producing sketches he will start to steer me towards certains directions. It's a very nice way of really pushing the boundaries of what the final illustration can be. A great way of working, and not one many clients tend to follow.   YTD: What are your tools? MARTIJN: Pencil and transparent paper mainly. And when I'm absolutely done drawing the whole thing out, I finish it in Illustrator. I want to get all my curves and lines as perfect as possible before I put everything into vectors.   YTD: What are your guiding principles throughout the project? MARTIJN: Those should be defined by the brief, I think, so that changes from project to project. But in this case the fox had to be friendly but strong, sort of a bad-ass but also trustworthy. Most of all we wanted to express freedom and dynamism.      YTD: Any other major brands you hope to work for in the future? MARTIJN: I'm not sure if there are any specific brands I would like to work for. I like the idea of every brand and client bringing it's own unique challenges and demands. Every project is unique and asks for it's own unique solutions. I like figuring out those solutions. I would love to work with Wolff Olins more though, they are great at finding striking new solutions to seemingly common problems. I'm a big fan of theirs. YTD: Thank you Martijn for spending some time with us. Anyone you would like to be thankful for? MARTIJN: Mike Abbink and Wolff Olins for getting me involved in this project and my wife and daughter for putting up with me working long hours.    |
Subscribe to:
Posts (Atom)